Why MOV Files and YouTube Need Special Attention on Windows
You’ve filmed something worth sharing. Maybe it’s drone footage from a weekend trip, a short film shot on a mirrorless camera, or a clip from your iPhone. The file is saved as a MOV, and you’re on a Windows PC. That’s where the friction starts.
MOV isn’t a bad format. The problem’s that MOV is Apple’s format, and Windows wasn’t built around it. Add YouTube’s specific encoding requirements on top of that, and you have two separate problems to solve before your video reaches an audience in the quality it deserves.
The MOV and Windows Compatibility Problem
MOV is a container format developed by Apple for QuickTime. The video and audio streams inside a MOV file often use codecs like Apple ProRes, HEVC/H.265, or H.264. On a Mac, these play and edit without issue. On a fresh Windows installation, the necessary codec support is frequently missing, which causes media players to fail, editing software to refuse the import, or playback to stutter and drop frames.
The root issue is codec support, not the MOV container itself. The solution is software that handles MOV decoding reliably regardless of what’s inside the file.
The YouTube Optimization Gap
YouTube re-encodes every video uploaded to its platform. If your source file is poorly formatted, that re-encoding process amplifies whatever flaws already exist. Getting the best possible result on YouTube means giving it the best possible source file to work from.
The key settings YouTube responds well to are: MP4 container with H.264 video and AAC audio, a resolution of at least 1080p (with 4K triggering YouTube’s higher quality VP9 codec for all viewers), and a high enough bitrate to give the encoder plenty of detail to preserve. Upload a well-prepared file and YouTube’s processing works in your favour. Upload a poorly prepared one and quality loss is baked in before a single viewer hits play.
Method 1: Native Windows Apps (Limited)
Windows includes Photos for basic playback and trimming, and Clipchamp for simple editing tasks. Both are free and already installed, which makes them a reasonable first stop for very minor tasks.
In practice, Photos frequently fails to play MOV files encoded with HEVC or ProRes codecs, even on updated Windows installations. Clipchamp can handle basic cuts and title additions, but its export options are generic and don’t align with YouTube’s recommended settings. There are no enhancement tools, no bitrate control, and no format-specific optimisation.
Best for: A single quick trim on a universally compatible file where quality and platform optimisation are not a concern.
Method 2: Dedicated Conversion and Enhancement Software (Recommended)
For most creators, the most practical path is purpose-built software that solves both problems of compatibility and YouTube optimisation, while without the complexity of a professional editing suite.
Two TotalMedia toolscover this workflow cleanly, each handling a distinct part of the process.
Solving MOV Compatibility with TotalMedia VideoConverter
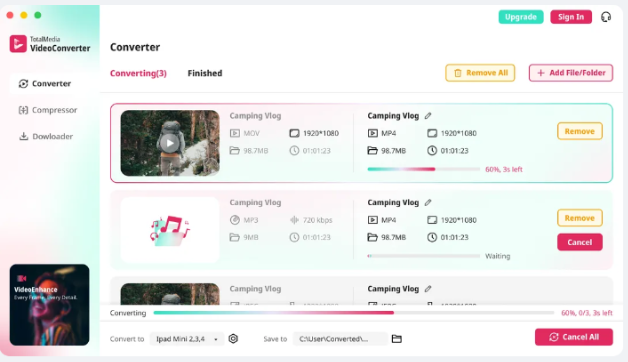
TotalMedia VideoConverter reads MOV files directly, regardless of the internal codec. Whether your footage came from an iPhone, a drone, a DSLR, or a mirrorless camera, the file imports without errors or choppy playback. From there, it converts to MP4 with H.264 video and AAC audio, which is exactly the format YouTube recommends, with full control over resolution, frame rate, and bitrate through the custom settings panel.
Web video presets for YouTube and Vimeo are built in, so the baseline export configuration is already set correctly. For users who want precise control, the custom settings panel allows manual adjustment of encoder, resolution, frame rate, and both video and audio bitrate. A real-time file size preview shows the expected output size before you commit to the export.
Batch processing means you can queue an entire folder of MOV files and convert them all in one session, with a live progress dashboard showing the status of each job.
TotalMedia VideoConverter is available as both a web app and a desktop application, so you can use it directly in a browser or install it locally depending on your preference.
When to Add TotalMedia VideoEnhance to Your Workflow
TotalMedia VideoConverter handles format conversion and export optimisation. If your footage also needs quality improvement before it goes to YouTube, that’s where TotalMedia VideoEnhance comes in as a dedicated pre-processing step.
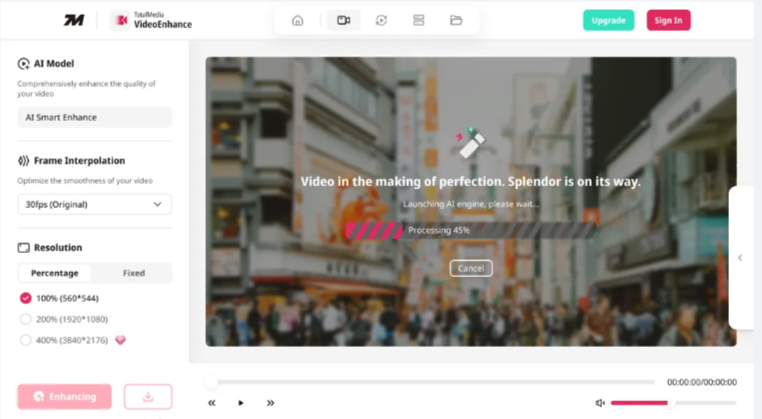
TotalMedia VideoEnhance is an AI-powered tool, also available as both a web app and desktop application, that uses its AI Smart Enhance engine to address noise, grain, compression artifacts, blur, and low contrast in a single pass. It also supports resolution upscaling up to 4K (with 8K available on the Pro plan) and frame interpolation for smoother motion.
The practical workflow is straightforward: run your MOV footage through VideoEnhance first if it needs quality work, then bring the enhanced output into VideoConverter for conversion and YouTube-optimised export. Each tool does what it’s built for, and the two steps together produce a significantly better result than conversion alone.
Step-by-Step: From MOV File to YouTube-Ready Video
Step 1 — Enhance Your Footage (If Needed)
If your footage is noisy, soft, or captured at a lower resolution than you’d like to upload, start with TotalMedia VideoEnhance.
- Open TotalMedia VideoEnhance in your browser or via the desktop app and upload your MOV file.
- Select AI Smart Enhance as the active model. This is the default setting and addresses noise, artifacts, contrast, and detail in one pass.
- Under Resolution, choose your target output. Select 200% for 1080p or 400% for 4K. Uploading at 4K to YouTube triggers the platform’s VP9 codec, which improves playback quality for all viewers regardless of their screen resolution.
- If your footage looks choppy or was shot at a low frame rate, enable Frame Interpolation and select a higher target frame rate. The AI generates new intermediate frames to smooth motion naturally.
- Use the split-screen preview to compare the before and after on your actual footage before committing to the full render.
- Click Enhance and download the output file in MP4 format when processing is complete.
Step 2 — Convert and Configure for YouTube
Once your footage is enhanced (or if it’s already in good shape and only needs conversion), open TotalMedia VideoConverter.
- Launch TotalMedia VideoConverter and navigate to the Converter in the left sidebar.
- Click Add File or drag and drop your MOV file (or the enhanced MP4 from Step 1) into the workspace.
- In the output format panel, select the Web Video tab and choose the YouTube preset. This sets the container to MP4 with H.264 video and AAC audio automatically.
- To fine-tune settings, click the gear icon to open the Custom Settings panel. Set your target resolution (3840×2160 for 4K or 1920×1080 for HD). For bitrate, target 35 to 45 Mbps for 4K or 15 to 20 Mbps for 1080p using Variable Bitrate (VBR). This gives YouTube a high-quality source file with enough detail for its encoder to preserve.
- Use the Save to field at the bottom to set your output folder.
- Click Convert. The live progress dashboard shows completion status and estimated time remaining.
Step 3 — Export and Upload
When conversion is complete, your file appears in the Finished tab. From there you can open the containing folder directly and upload to YouTube. The file is formatted correctly, encoded at the right bitrate, and ready for YouTube’s processing pipeline to handle cleanly.
Method 3: Professional Editing Suites (For Complex Projects)
Adobe Premiere Pro, DaVinci Resolve, and Final Cut Pro can handle MOV files and offer complete creative control over every aspect of the edit. For professional filmmakers, colorists, and editors working on complex narrative or commercial projects, these tools are appropriate and well-suited to the work.
For a creator whose goal is to get MOV footage from a camera onto YouTube in good quality, they represent unnecessary complexity. Subscription costs are significant, the learning curve is steep, and tasks like upscaling or advanced denoising require additional third-party plugins on top of the base software cost. Configuring a YouTube export manually across multiple panels and menus takes considerably longer than selecting a preset in a purpose-built tool.
Best for: Professional editors and colorists working on projects that require full editorial control, multi-track timelines, and advanced color work as part of the same workflow.

Which Workflow Is Right for You?
| Feature | Native Windows Apps | TotalMedia VideoConverter | TotalMedia VideoEnhance | Professional Suites |
| MOV File Compatibility | Unreliable | Excellent | Excellent | Good (with setup) |
| YouTube Export Preset | No | Yes — built-in | Not applicable | Manual configuration |
| Custom Bitrate Control | No | Yes | Not applicable | Yes |
| AI Quality Enhancement | No | No | Yes — AI Smart Enhance | Requires plugins |
| Resolution Upscaling | No | No | Yes — up to 4K / 8K Pro | Requires plugins |
| Frame Interpolation | No | No | Yes | No |
| Batch Processing | No | Yes | Yes (multi-file queue) | Yes |
| Platform | Windows only | Web app + Desktop | Web app + Desktop | Desktop only |
| Cost | Free | One-time / tiered | Free tier + Pro upgrade | High subscription |
| Best For | Quick viewing or trimming | Most creators and editors | Footage needing quality work | Film professionals |
From Camera to YouTube Without the Guesswork
MOV compatibility on Windows and YouTube export optimisation are two solvable problems. They don’t require workarounds, guesswork, or a professional editing suite. They just require the right tools applied in the right order.
For footage that’s already in good shape, TotalMedia Video Converter handles the full journey from MOV file to YouTube-ready MP4 with a built-in preset, full bitrate control, and batch processing for larger projects. For footage that needs quality improvement first, running it through TotalMedia VideoEnhance as a pre-processing step adds AI-powered restoration, upscaling, and motion smoothing before the conversion happens. Both tools are available as web apps and desktop applications, so you can work in whatever environment suits you.
If you’re also working with older or lower-quality footage in other formats, our related guide covers more ground: From Legacy to 4K: The Best Software to Upscale AVI and Enhance M2TS Camcorder Videos.
Ready to get started? Try TotalMedia today and take your footage from camera to YouTube with confidence.
Disclaimer: Export settings and bitrate recommendations are based on YouTube’s published guidelines and may change over time. Always check YouTube’s current recommended upload specifications before exporting large projects.
FAQ
Yes. VideoConverter handles MOV files from iPhones, DSLRs, drones, and mirrorless cameras, including those encoded with H.264, HEVC/H.265, and other common codecs that Windows struggles with natively. No additional codec packs are needed.
It depends on your footage. If your video is already clean and sharp, VideoConverter alone is enough — import the MOV, select the YouTube preset, and export. If your footage is noisy, soft, or low resolution, run it through VideoEnhance first to improve quality, then bring the output into VideoConverter for the final YouTube export.
Yes, in most cases. Upscaling to 4K before uploading triggers YouTube’s VP9 codec, which is higher quality than the codec applied to standard 1080p uploads. The difference is most noticeable on high-motion footage. TotalMedia VideoEnhance handles this upscale using AI rather than simple resizing, so the result is genuinely sharper rather than just a larger file.
YouTube’s own guidelines recommend 35 to 45 Mbps for 4K content and 15 to 20 Mbps for 1080p, using Variable Bitrate (VBR). These settings give YouTube’s encoder enough detail to work with, reducing the chance of visible compression artifacts in the final upload. Both can be set manually in VideoConverter’s Custom Settings panel.
YouTube allows uploads up to 256GB or 12 hours in length for verified accounts. For most creators, file size isn’t the limiting factor — but if you need to reduce the size of a large export without sacrificing quality, VideoConverter’s AI compression tool can help bring the file size down before upload.